That’s right – your common every day make-you-cry cooking onion!
They sometimes bring tears to your eyes when you chop them, and are reputed to have antiseptic qualities to help cure colds and improve health.

But in a dyers world, the paper thin skins are a remarkable source of dye. They give the most wonderful colours from deep bronze to palest yellow, depending on how much you use and what mordant.
So how do you do it…
Well first you have to collect your skins – I spent quite a lot of Saturday mornings in my local green-grocers shop peeling onions! It turned out to a mutually beneficial process, as he ended up with a lot of nice looking onions – while I got my dye bath material!
It was a bit strange on one of those mornings when a friend walked in and found me peeling them; it was even stranger the following week at work trying to explain to his wife what I had been doing; I’ve found over the years that explaining re-enactment activities takes a lot of time and patience as the stories often don’t often time travel well!
All the information I’d discovered suggested that it would take one third of the weight of wool to dye material…. those skins don’t weigh a lot so I spent quite a lot of time with my grocer friend.
Back to the dyeing.
I had 400g of aran weight wool to dye, so I put 140g onion skins into a steel pot and covered them with rain water (from the water butt); put the pot on the cooker, brought to the boil and simmered for an hour. The water turns a deep bronze colour.


I strain the skins and keep the water. This is your dye bath. Just so you know, the dye can stain everything from counter tops to your fingers!
The next bit is optional; I re-cover the skins again, repeating the process to get the maximum amount of colour from the onions skins. Add this to your first lot of dye.
I described in a previous blog how to mordant wool. Onions provide a substantive dye, and as such do not require any mordant. However I find that the mordanted wool gives a brighter colour and prefer to use mordanted wool.
I soak the mordanted wool in rain water – it’s at times like these I’m almost glad that it rains so much in Ireland. Pre-soaking the wool means that the dye is taken up more evenly along the wool and the finished wool doesn’t look patchy.
Add the wool to the dye bath and gradually raise the temperature. Stir occasionally; to be honest I find that the simmering water agitates the wool on its own; over agitating will felt the wool.


I kept the dye bath simmering for an hour and then removed the wool. You can still use the dye bath but as you will have already used some of the dye in the water, the next batch will be lighter in colour; this is exhaustive dying; where you exhaust the dye bath of colour.
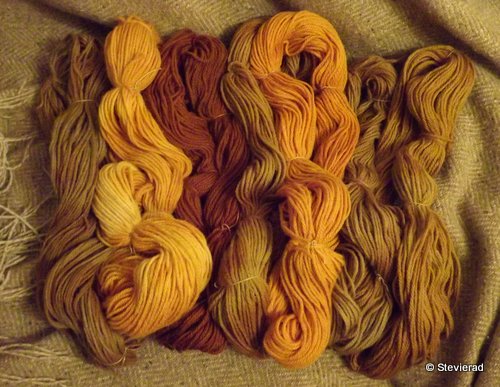
 These are hanks of wool I had dyed previously by exhausting the dyebath.
Todays dyeing gave me some beautiful colours! The hank on the left is colour I got after simmering the wool for 1 hour. I was experimenting today; a Danish dye friend had told me last year that you can get interesting ‘patchy’ results by twisting the hanks of wool like the hanks above, and then adding them to the bath.
The hank on the right was my result from tie-dyeing today. Look carefully and you can see that the wool is not a uniform colour throughout; Result!!!!!


I was so delighted with my results that I decided to experiment a bit more. There were two hanks still in the dyebath, and I knew that you could add copper sulphate as a mordant at the end of the dyeing process to change the colour.
I added 3 teaspoons to the dye bath and simmered for another hour and got this;
 It’s the the most wonderful bronzey brown!
I thought there was still some colour left to be had ; I’d dyed some wool before Christmas with Walnuts, but the result had been very disappointing.
‘What the heck’ I thought, so I added two hanks of that to the bath. Just to be on the safe side I added a handful of onion skins to deepen the colour.


The hank on the left was the walnut dyed wool; on the right was today’s over dye result. Definite improvement!
So there you have it; my guide to dyeing with onions.
I’m delighted with the results; a wonderful set of colours!


 After posting it, a reader commented that if I had used red onion skins, I would have gotten the same results. Nothing like a bit of experimentation……..
 After simmering for an hour, I drained the water off the skins and used this as my dye.
 I have to say that it looked quite promising. After simmering for an hour I got the following results.

 They are really lovely colours. The question was did the red onions give the same colour as the plain onions with a copper mordant?