Viking bed……

In 1904 a viking burial mound containing a viking ship was discovered at Oseberg in Norway. The grave contained two female skeletons and an array of grave goods. Irish archaeology have a great post on their blog which outlines the burial and the finds; they also have some great photos.

My main interest in the Oseberg ship is purely selfish! And if you have ever camped you will fully understand why I was so interested in them!

There is nothing worse than waking in the morning after having spent the night on the cold damp floor of a tent. Yes, we had beds and coverings to make life more comfortable, but we were on the ground. I’m no spring chicken any more and I like a bit of comfort when I’m away.
During the Oseberg excavations, the remains of three beds were found. I first saw one of these beds at a viking event in Northern Ireland and thought ‘that is a great idea!!’
So Bob and I had a wee chat, and over one winter he built us a bed. It is based on the Oseberg design, but the ornate carvings on the corner posts were not really an option as our little A-frame tent wasn’t big enough to accommodate that. Our solution was to make the bed ends without the carvings. To be honest it’s a bit more like the Gokstad bed, also discovered in Norway (in 1880).

Here are a couple of photos of the bed assembled in the tent. You can see that if we had the carved ends then they would have pushed hard against the canvas.

This slideshow requires JavaScript.

The bed is flat pack. We joke that there is a reason that the Swedes have Ikea…….. and that the vikings were the first ‘flat pack people’! It makes sense, as the bed packs away easily for transport. I’ve included a couple of photos of how the bed slots together at the corners.

This slideshow requires JavaScript.

When it’s all assembled, we cover it with our sleeping skins. Looks pretty comfortable – and trust me…….. it is! Another great thing is that it increases our storage space as we can use the space under the bed.
Bob swears he should have made one years ago. Just proves my point; it takes a good woman to sort these viking lads out!!

This slideshow requires JavaScript.

If you’re interested in making one of these beds yourself, there are some plans here on livinghistory.co.uk.

Red Onions to dye……..

So you might remember that I blogged about dyeing with the skins of white onions back in February; they have the gold/yellow papery skins. I had added a copper mordant to the dye pot at the end in an attempt to create a deeper, richer colour. The photo below shows the result from then.
The yellow colour was from dyeing the wool for one hour in an onion dye stuff; the deeper brown colour was created after adding the copper mordant.

1-DSCF2979After posting it, a reader commented that if I had used red onion skins, I would have gotten the same results. Nothing like a bit of experimentation……..

I tried to keep the red onion dye prep as close to the original. I used the same method I had used for the plain onion skins. I use one third the weight of the wool in skins; 33g of skins per 100g of wool. I also used the same wool type and water source.
I boiled the skins in rain water to get the dye stuff.

1-DSCF3357After simmering for an hour, I drained the water off the skins and used this as my dye.
When I added the wool I got

1-DSCF3362

1-DSCF3364I have to say that it looked quite promising. After simmering for an hour I got the following results.1-DSCF3378 1-DSCF34001-DSCF3382They are really lovely colours. The question was did the red onions give the same colour as the plain onions with a copper mordant?

To me the answer has to be no; at least not in this case. The copper mordant seemed to have dyed the wool a deeper shade of brown, whereas the red onion skins gave a deeper gold yellow. But to be honest, both dyeing attempts gave beautiful colours…. Now to start saving skins all over again…….

Ivy as a Natural Dye Material

1-DSCF3347

Ivy; there’s tons of it growing over my yard wall, and Bob had asked what colours we would get with the leaves and berries. So I decided to give it a go.

1-DSCF3350

I had tried this a couple of months ago without the berries. But this time I wanted to include them so I needed to wait until they had ripened. I hadn’t taken any photos last time, but the results were much the same.

I used the same procedure as with the other dyestuffs; twice the weight of dye material to wool. Also I let the twigs, leaves and berries soak for a week to get the maximum amount of dye in the pot.

1-DSCF3351

As usual I had pre-mordanted the wool with Alum. I wanted to dye 300g of Aran weight wool.
When I added the wool initially there was no significant change to the colour.

1-DSCF3356

After an hour, there was a definite change in colour, but not the green I had hoped for. Instead I got a yellow; nice but not what I had wanted.

1-DSCF3359

So I added copper sulphate to the pot (2 teaspoons per 100g wool), and continued to simmer for a further hour. This gave a better result. It’s green, but still not the green I had wanted. In real life it’s a slightly darker; below is a photo I took in natural daylight the following day, after the wool had dried.

1-DSCF3398

Last year using the same ivy plant I got a great green that I used in a hat for Bob. This was a different type of wool, and a different year, so that may account for the difference. My little nettle patch is growing, so I plan on trying those for a green……..

Viking Training in Swords.

That sounds like a bit of a quirky title…… but Fingal Living History Society hosted a training weekend in the grounds of Swords Castle, Co Dublin; and yes, some of the training involved sword fighting.
Mind you, there were also spears and axes, and Dane axes and a bill hook if my eyes didn’t deceive me!

1-DSCF3230 1-DSCF3218

There was a really good attendance for this training weekend. There were around fifty fighters representing groups from Dublin, Waterford, Cork, Downpatrick, Clare and also from England (apologies if I managed to miss anyone out there!).

The re-enactors use the training weekends to brush up on their weapons of choice, and also to learn other fight techniques. The less experienced fighters learn from the more experienced, and they get to practice as well. Here is a small selection of photos of the fighters playing in the castle grounds.

This slideshow requires JavaScript.

The training can be one on one, or as a groups of fighters against other groups.

This slideshow requires JavaScript.

There is also a huge social aspect to this event as it gives members of different groups to meet and socialise with each other.

But it’s not all about the fighters and their  toys; the crafters also get together for what is sometimes referred to as a ‘stitch and bitch’. I managed to teach some people how to nalbind, and a friend spent some time teaching a few of us how to finger braid with five loops. Unfortunately I didn’t take any photos, but I did find this site that has some instructions and pictures. The braids would have been used to decorate hems on garments.

Great weekend away with lots done; looking forward to the next event!

An unexpected blue!!

This dyeing lark can becoming a bit addictive!! Since I started I find myself looking at plants in a whole new light; where before I thought about texture, colour and where the plant would fit in my garden, I now find myself looking at a plant and wondering what colour would it give to my wool? This now also seems to apply to the vegetables I cook!

1-DSCF3167

After my beetroot experiments. someone mentioned red cabbage as another plant that gives unexpected results. Naturally I had to give it a go, so I went back to the greengrocer (he really is a lovely man) and got some cabbage.

While I have no proof that the vikings would have used red cabbage as a dye stuff, it is another example of a colour which my be achieved from using natural dyes.

I used the same principle as the beetroot (twice the weight of dye material to the weight of wool), and the same method of preparing the dyebath.

1-DSCF3169
I used some wool that I had mordanted with alum before, and when I first added the wool I was quite hopeful of getting a pinky rose colour; it looked quite promising.

1-DSCF3173

But one thing that natural dyeing has taught me is that things are seldom as they appear; after half an hour the wool had changed colour again…….. to a more slate blue.

1-DSCF3174

After simmering for an hour, washing and rinsing, here’s what I got…………….. blue! A very nice blue.

It’s another good colour to add to the previous ones.

However I have been told that red cabbage is not completely light fast (and that it may fade in colour). I’ll just have to keep an eye on it and see if that’s true or not.

Now, what else have I lying in my fridge?

Beetroot……..not what you might expect!

Beetroot stains………everything! It stains chopping boards, fingers, dishcloths and white cotton material a deep crimsony red. So as a natural dyer you’d be forgiven for thinking that you wouldd get that colour if you dyed wool with beetroot. Sorry guys – not gonna happen.

I figured the best way to show this would be to dye some wool with beetroot and share my results.

First thing to do was to get some beetroot, so I headed back to friendly greengrocer and bought some.
All the literature I had read suggested twice the weight of dye material to weight of wool. However I wasn’t feeling overly confident about this project, so I bought 900g beetroots to dye 300g of wool.

1-DSCF3144
After a quick wash, the wonderful colour was more apparent….. maybe it would work; after all my fingers were now red!

1-DSCF3150

I chopped the beetroot up, covered with rain water and boiled for an hour. I use rainwater as it is more natural than the tap water in my area.
Then to extract as much dye as possible, I drained that off, re-covered the beetroot and repeated the process. In the pot the water had turn a wonderful shade of crimson.

1-DSCF3151
In a previous post about mordants, I had commented that some dye materials do not stick to the wool. Beetroot is one of these.  So I decided to do a little experiment; dye one hank in the half the dye-bath with un-mordanted wool. It looked so promising, however as soon as I took the wool out of the pot the colour went; I now had a very pale beige colour.
One thing I should point out is that the photographs are not exact replicas of the colours I’ve achieved, but they should give an indication of what happened.

1-DSCF3153 1-DSCF3154

It wasn’t a colour that really appealed to me. Anyway, after boiling for another hour, I got this;

1-DSCF3157

It’s a very pale beige colour. And there you have it; dye extracted from beetroot will not stick to wool that is not mordanted.
But would a mordant make much, if any, difference?

I’d already mordanted some wool and I added that to the dye-bath. Still no vivid red, but at this stage any colour would have been good; this looked more promising.

1-DSCF3158

When I took the wool out of the pot, the colour held. Not the brilliant red one would expect from beetroot, but a soft peachy gold colour.

1-DSCF3161

I left the wool simmering in the pot for an hour. I let the wool cool, then rinsed it through in cool water. When i was finished I had two hanks of peach gold wool. They’re quite a nice colour actually.

1-DSCF3163

As a comparison, this is a photo of the mordanted and unmordanted wool together. The colours in the photo are not as true to life as I’d like them, but I think they give an idea of the colours achieved and the need for a mordant if using beetroot as a dye-stuff.

1-DSCF3165

This was quite fun to do.
As a dye material, beetroot will not give you a vivid red (unfortunately) but it will give a rather nice peach gold colour. Would I use it again – yes!

Nalbinding; getting started with the Oslo stitch.

So you’ve decided to do some nalbinding. But where do you start?

Many of the videos that I have found are excellent for demonstrating the actual stitches, but they have complicated descriptions of ways of making the starting loops. I found these videos quite confusing when I was starting, so I tried to find other ways to make that first stitch. Through trial and error, I found a way that suited me.
This is what I do; I’m not saying that this is the only way, but it’s what I find easiest.

First you need to cut a piece of yarn approximately 1m long (about two arm-lengths). You can use longer, but for a beginner using longer lengths can make the nalbinding more awkward.
Thread the yarn through your needle, keeping the two ends at different length.

For description purposes, the working end is the end of the yarn that is attached to the needle, and the free end is the other.
Put the needle down for a moment.

Make a loose knot in the yarn, and place the knot loop on the pad of your thumb.

01-1

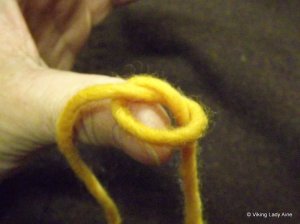
Take the knotted yarn loosely between your thumb and index finger, so the working end runs between the left thumb and forefinger, and lies across the thumb. NB the working end must run between your thumb and forefinger! The loop sitting up behind your thumb is what is referred to as the halo stitch.

02-006

Now using your needle, pass the needle through the halo loop from the back towards you. Then continue the needle under the working length of yarn lying between your thumb and index finger at the cross over point.
This will work best if you come from the side of the loop instead of the top of it.

06-010 08-012

 The aim is to create another loop that runs across the front of your thumb. Pull the needle and yarn slowly through keeping a light hold on the stitches, until there is a loop around the front of your thumb. The loop around the front of your thumb is your working loop. You have now created a basic stitch to begin with.

10-014

So far so good (I hope!).

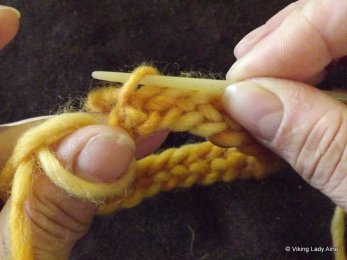
Now for the first Oslo stitch. Pass the needle through the halo away from you.

01-7

Do not push the needle the whole way through the halo, but twist the needle round so the point passes back down under the working loop and the long piece of yarn at the cross over point. The easiest way to do this is on the pad at the back of your thumb. You can move your index finger slightly back out of the way until you have the needle in place.

03-9  02-8

Then lightly hold the cross over point between your index finger and thumb, and pull your needle and yarn through. You will now have two loops on your thumb, with the newest loop closer to your nail bed.

04-10

Push the older loop off the end of your thumb to create your new halo loop, keeping the newer loop on your thumb to create your new working loop.

05-11

You now have two loops at the back of your thumb. If you are unsure of which  is the halo and which is the working stitch, pull the working yarn and the working loop will tighten.

06-12

Continue these steps in this section to create a chain, picking up each new halo away from you, and twisting the needle back down through the working loop and under the working end of the yarn.
The chain length will depend on what you want to make. In my example I have done 25 stitches, but for a bag you will probably need more. You can make the chain as long as you need for the opening of the bag or hat. The chain can look ‘messy’ as you create it. (To smooth it out, take both ends and pull gently and the stitches will even out.

07-13

When you have the length of chain you need, you will have to join the ends in a circle. The chain should be straight and not twisted. Bring the free end of the chain round to meet the needle end. Pick the first stitch up by passing the needle away from you through it.Do not push the needle the whole way through. (This will be the connection stitch. As the connection stitch is picked up front-to-back the connection is termed F1).

08-14

After you have picked up the connection stitch, make the Oslo stitch as described above; with the connection stitch on the needle, continue to pass the needle through the halo away from you, twist the needle back and down through the working stitch and the working end of the yarn as you did for the chain Oslo stitch.

09-15

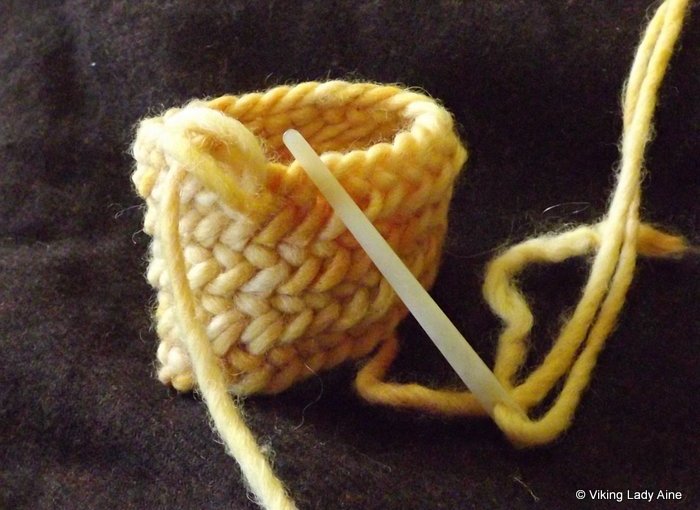
Continue by picking up the second stitch on the original chain and working a basic Oslo stitch.

                                  10-16

As you continue working, the nalbinded piece will work up into a tube. This is my basic method for starting hats,mittens and bags.

11-17

So that’s my way of starting nalbinding with the Oslo stitch.

If I want to use a stitch that requires more than one halo loop, then I just pick up more as I go along; first two stitches for Mammen, three for Broden and so on. I find that this also gives a graduated start to the piece as opposed to a block end effect.

I use videos to help me learn the stitches. This link is to the best site I found for video instructions.

Happy nalbinding! And remember – practice and perseverance.